|
|
|
Building a Balanced keyboard
You can actually build a Balanced keyboard quite easily, by swapping around and
re-painting some of the keys on an existing keyboard. Examples of keyboards
which have already been converted to Balanced keyboards are:
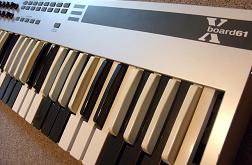
- E-mu Xboard 61
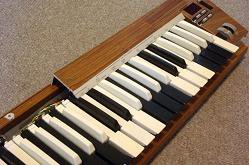
- Quickshot MIDI Composer
- Yamaha EX5
- Alesis Q49
- Acoustic piano! (considerably more complex to do however)
 |
 |
|
E-mu Xboard 61 |
Quickshot MIDI Composer, much modified |
If you want to build a Balanced keyboard but don't want to use your main
(expensive?) electronic keyboard, you can buy a cheap MIDI controller keyboard
and convert that instead, and connect it to your main keyboard (or sound module
or computer) with a MIDI cable.
Converting a standard electronic keyboard to a Balanced keyboard requires only basic mechanical
skill - you could probably do it over a
couple of afternoons.
The conversion is possible because many of today's electronic keyboards
have very simple and evenly-spaced key mechanics, allowing the keys to
be easily removed and rearranged into the Balanced keyboard pattern.
Types of keyboards which could probably be converted
The conversion will be possible on many of the available controller
keyboards, synthesiser keyboards and consumer keyboards. The information
presented here is based on my experiences with the E-mu Xboard 61 and the Quickshot Midi Composer
keyboards.
Because there are many different makes and models of keyboard, the procedures
discussed in the following steps can only be a general guide. Some mechanical creativity may be
required if the following descriptions do not exactly match your
keyboard.
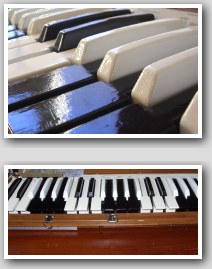
The end product
Because a Balanced keyboard uses 6 top-row keys per octave instead of
5, the resulting Balanced keyboard will be shorter than the original standard
keyboard. A standard 5-octave keyboard gives about 4 octaves after it has been converted,
and a 4-octave
standard keyboard gives about 3-1/2 octaves. Therefore, a small part of the final
keyboard will have some keys missing.
Converting your standard keyboard to a Balanced keyboard will
definitely void any warranty that the keyboard may have.
If you want to change your Balanced keyboard back
to a standard keyboard in the future, this is always possible, but it could be a bit
messy because some keys will need to be repainted again.
DISCLAIMER
The instructions here are provided strictly on an 'as is' basis.
Any work you undertake from these instructions is done entirely at
your own risk. No responsibility whatsoever can be taken for any
injury (or worse) resulting from any instructions given here, or for
any damage to, and / or loss of warranty of, your keyboard, or any
other related loss or damage whatsoever. |
What you'll need
The following is a rough list of what you'll need to perform the
conversion. Items with a question mark might be required.
- Screwdriver, to fit keyboard
enclosure screws (usually Phillips)
- Black and white paint - preferably
spray paint - if not then a brush is also required
- Cleaning / degreasing fluid, e.g.
methylated spirits / white spirit
- Sharp hobby knife, or file? (for
trimming key locating pillars, see Steps 4 and 6)
- Flat-bladed screwdriver? (for
prising enclosure apart, see Step 1)
- Pliers? (for manipulating key
retaining springs, see Step 2 and 6)
Step 0: Disconnecting all power supplies
*** VERY
IMPORTANT ****
|
TO AVOID ANY
RISK OF ELECTRIC SHOCK, UNPLUG THE KEYBOARD COMPLETELY FROM THE
MAINS OR ANY OTHER POWER SOURCE BEFORE COMMENCING. ALSO, TAKE ANY
BATTERIES OUT.
|
Step 1: Opening the keyboard enclosure
Firstly, you will need to open the keyboard enclosure. Keyboard
enclosures usually consist of two halves, a top half and a bottom half.
The keyboard key assembly itself (as well as most of the internal
electronic equipment) is usually mounted onto the bottom half, with the
top half being able to be lifted away.
Separating the two halves of the
keyboard enclosure.
|
The two halves will normally be held together by screws. The screws
(10-20 of them) will be on the underside of the keyboard, towards the
edges. However, also on the underside will probably be other screws for
holding internal equipment in place, which should not be removed - these
screws will probably be more towards the middle of the underside. This
is shown in the example diagram below - the black blobs around the edges
represent the enclosure screws, while the white blobs in the middle
represent the ones holding internal equipment in place.
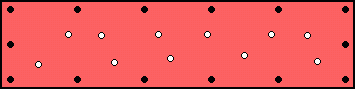
Example of screws on the underside
of the keyboard.
|
Now begin unscrewing the screws which you think are appropriate. If the
screws are different lengths then you will need to keep track of which
ones go where. Some enclosures may have secondary plastic clips, which
you will need to prise gently apart with a flat-bladed screwdriver.
Also, it is possible that one or more of the enclosure screws may be
hidden under a label or warranty plate - if so then the label or plate
will need to be removed to gain access to the hidden screws.
Once you have unscrewed the screws which you think are appropriate, try
lifting off the top of the enclosure. There may be some electrical
cables connecting the top half to the bottom half. Take care not to
damage these. They can usually be temporarily unplugged - take note of
how they were connected before unplugging them.
With the top half of the enclosure removed, hopefully you should now
have full access to the keys, especially the back ends of the keys. If
there is internal hardware which blocks access to the rear of the keys
then this will have to be temporarily unscrewed and moved out of the
way.
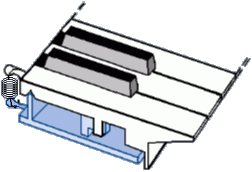
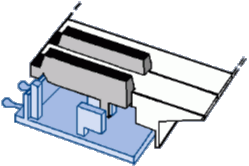
Step 2: Removing the keys
You will now need to remove all of the keys. The keys will probably be
held in place by a combination of two locating pillars and a spring. The
diagrams below show a key in place with the spring at the rear, and then
a key removed to reveal the two locating pillars. For clarity, these
diagrams do not show the actual electrical key switches.
 |
 |
Key mechanism,
showing spring at rear |
Key mechanism
with a key
removed, showing the two
locating pillars under each key |
Before removing the keys themselves, you
will first need to remove the springs at the back ends of the keys. The
springs can be removed using pliers. Note how the springs sit normally.
Be careful not to lose any springs.
Now you will need to remove the keys one by one. The bottom-row keys
need to be removed first, followed by the top-row keys. There may be
loose rubber shock absorbers mounted under the keys - take care not to
lose any of these. Remove each key by first lifting it at the back and
then bringing it forward. If all is well you should end up with a big
pile of keys and a smaller pile of springs, as well as a stripped-down
keyboard.
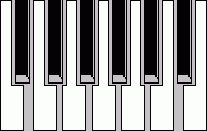
Step 3: Getting familiar with the different types of
keys
You have probably noticed that there are different types of keys,
depending on where they are on the keyboard. The black top-row ones are
all exactly the same in shape. The white bottom-row keys, however, have
a number of different shapes, depending on where they are located on the
keyboard. There are 7 different types of keys, as follows:
 |
 |
 |
 |
 |
 |
 |
Different types of keys on the standard keyboard. |
Step 4: Checking and
preparing the new key arrangement
Now that you've come this far, this next step is critical to making
sure that your keyboard can be successfully converted into a Balanced
keyboard. There are two stages to this.
Firstly, you need to check that the arrangement of the electrical
switches under the keys is suitable. You should be able to see the key
switches - they may be rubbery nodules, or other small metal or plastic
units with moving actuators, arranged along the length of the keyboard.
For the conversion to be possible, they must be in a single straight
line, and perfectly regularly spaced along the entire length of the
keyboard.
The second bit is to check that the keys themselves will fit into place
in the new Balanced key arrangment, by carrying out a trial
installation. This is best done by carrying out a trial installation of
an octave of keys, layed out exactly as follows, to test that all the
types of keys will fit properly.
 |
One-octave trial installation of
keys. |
Attempt to install the keys exactly as shown, starting at the left-hand
end of the keyboard. You may find that a few of them do not seem to fit
in place. This may be because the locating pillars under these keys may
be too wide for the type of key you're trying to fit on them (the
different widths of the locating pillars are there to help with original
factory assembly). If this is the case, try narrowing the offending
locating pillar(s) by shaving off SMALL amounts off both sides using a
hobby knife or file, until they fit.
Hopefully all of the keys in the octave should eventually fit into
place. If not then you will need to use some creative mechanical
judgement to find out what the problem may be - if you decide it is
unresolvable then it would be best to stop there, reassemble your
keyboard and call it a day. However, if all is well then remove all of
the keys again - it's time for some painting.
Step 5: Painting the keys
The next step is to re-paint some of the keys. Some of the white ones
need to be painted black and some of the black ones white. The
inventories of the types of keys which you will need are as follows, for
4- and 5-octave keyboards. The highlighted keys are the ones which have
to be repainted.
| Keys required
for 4-octave Balanced keyboard |
Key
Type |
|
|
|
|
|

|

|

|
 |
| Qty |
5 |
1 |
1 |
5 |
8 |
3 |
3 |
3 |
12 |
| Keys required
for 5-octave Balanced keyboard |
Key
Type |
|
|
|
|
|

|
 |
|
|
| Qty |
6 |
3 |
5 |
9 |
3 |
3 |
3 |
3 |
16 |
Before painting the keys you will need to
clean and de-grease them thoroughly, so that the paint will stick
properly. You can use a cleaning agent such as methylated spirits-
however, check that the cleaning agent which you use doesn't dissolve
the plastic of the keys, by rubbing into the underside of a key first.
You can now paint the keys. Spray painting is recommended over using a
brush because it produces a nicer finish. Plan how you will place the
keys when the paint is drying. Follow the paint manufacturer's
instructions. Try to paint over all areas of the keys which will be
visible when the keyboard is reassembled. For a thorough job, apply more
than 1 coat - allow sufficient drying time between coats.
Step 6: Assembling the keys into the new arrangement
You now need to reassemble the keys into the keyboard in the Balanced
keyboard arrangement. Depending on whether you need to shave some
locating pillars in the one-octave trial in Step 4, this will need to be
done for some more keys across the keyboard. You can do it as you go
along - check that the keys move freely. Also, attach each spring to the
back of each key as you go along, and check that any rubber shock
absorbers under the keys are in place.
Insert all top-row keys first, one in every second key location. The
pattern is 2 black, 4 white, 2 black, 4 white, etc. Then do the bottom
row. The bottom-row keys need to go in a special arrangement, to
minimise the untidiness of the gaps between the keys, as well as get the
right black and white pattern.
Balanced
keyboard key arrangement
(from 4-octave standard keyboard)
|
|
 |
|
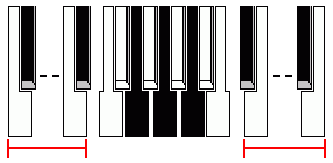 |
Left-end
keys
x 8 |
|
Right-end
keys
x 8 |
Balanced
keyboard key arrangement
(from 5-octave standard keyboard)
|
|
 |
|
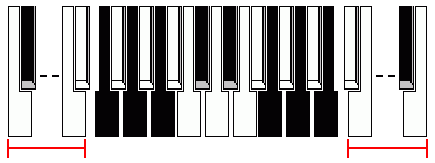 |
Left-end
keys
x 9 |
|
Right-end
keys
x 8
|
Note that all of the left-type keys (the old C's and F's) go at the
left end of the keyboard, the right-type keys (the old E's and B's) all
go at the right end of the keyboard, and the middle-type keys (old
G-D-D-A, in that pattern) go in the middle.
Step 7: Reassembling the enclosure
Finally, the enclosure needs to be reassembled. Re-connect any
disconnected cables, replace the top half of the enclosure onto the
bottom half, and then screw in all screws. The screws don't have to be
too tight - be especially careful not to overtighten screws which screw
into plastic.
You now have a Balanced keyboard!
|
|